Asana, ClickUp, Trello… trust me I’ve used them all and more.
I spent hours setting all of these up only to find that a day, a week or a month later I forgot they existed. Then I found Notion. I’ve used it every single day for two years, it’s the only thing I’ve stuck with and it’s really been a game changer for me.
However, when you first get started with Notion, it can feel really overwhelming because it’s essentially a blank canvas that you can set up in so many different ways.
So if you’ve struggled to find a tool that works for you, I’m going to show you everything that Notion has to offer and show you my setup to give you some inspiration.
What is Notion?
Notion is a free organisational/project management tool or workspace. I can almost guarantee that it’s more powerful than anything you’ve tried before.
My favourite thing about Notion is how customisable it is. I think that’s the reason I never stuck with a system before because I couldn’t make it work for my life, my work and my content.
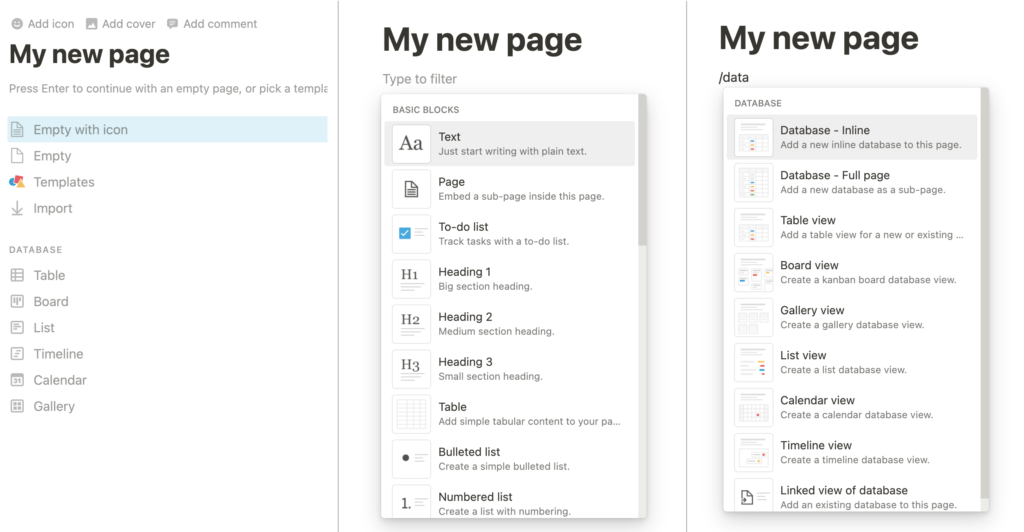
It runs on the concept of building out pages, blocks and databases. This is where Notion really stands out against anything else.
What are pages and blocks in Notion?
Within Notion, you can create pages and subpages. Everything within that page is made up of blocks. Blocks can be simple text, headings, checklists, bullet points, quotes, callouts and more.
Along with blocks of content, you can also add databases.
What are databases in Notion?
A database is a collection of pages within a container. Think of a spreadsheet, where there’s different rows and columns of information. Now imagine if you could click into each cell individually to add other spreadsheets or other content.
Databases can have many properties and you can search, filter and sort by property values.
Databases can also have multiple views letting you display the content in different formats. So you can view the content as a table, Kanban board, list, timetable, calendar or gallery. You can also embed these databases on any page.
I know it sounds complicated, so let’s take a look at my setup to give you a better idea of how this all works.
My Notion Tour
I’ve set my Notion up to have three main sections: life, work and school. These main pages act as a hub or dashboard to give me an overview of that section. Within these, there’s multiple subpages and databases related to that main topic. I also have a reference section for miscellaneous content.
Reference Section: Master Tasks and Library
First up, let’s discuss my reference section. This holds two big databases – my master task list and my library.
These are simply databases that have a couple of different properties. For example my task list database as a done checkbox, a due date and a context property. While my library database has properties like topic, status, type and URL.
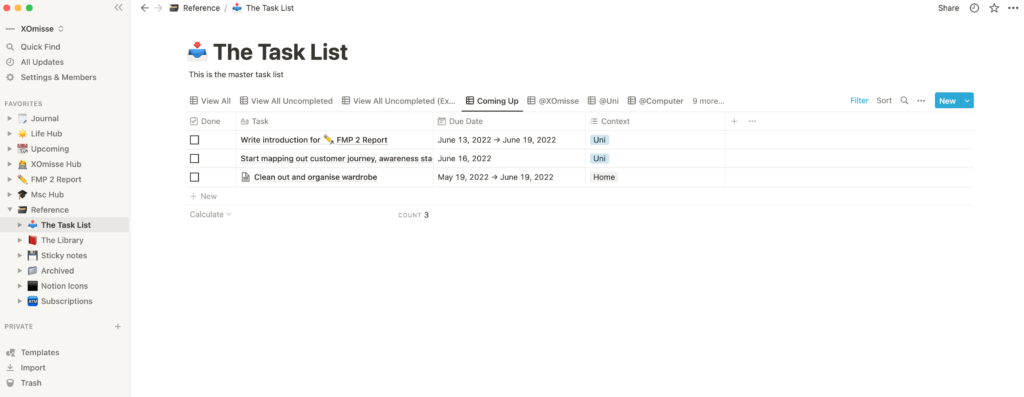
Both of these databases are in my reference section because I pull them into my main life, XOmisse (work) and MSC (school) hubs. For example, I have my task list shown within my life, work and school pages but I filter the database so only the tasks related to that section are shown.
This just keeps it super organised for me, so I can have one master task list instead of multiple individual ones.

My library is similar, it keeps the information about what I’m consuming – whether that be courses, ebooks, books or podcasts. This way I can keep track of my progress and any notes or interesting topics that come up.
I don’t use my sticky notes database too often, but I just put random notes in there and use it like a notebook to jot things down that I can refer back to if needed.
Life Hub: daily journal and tasks
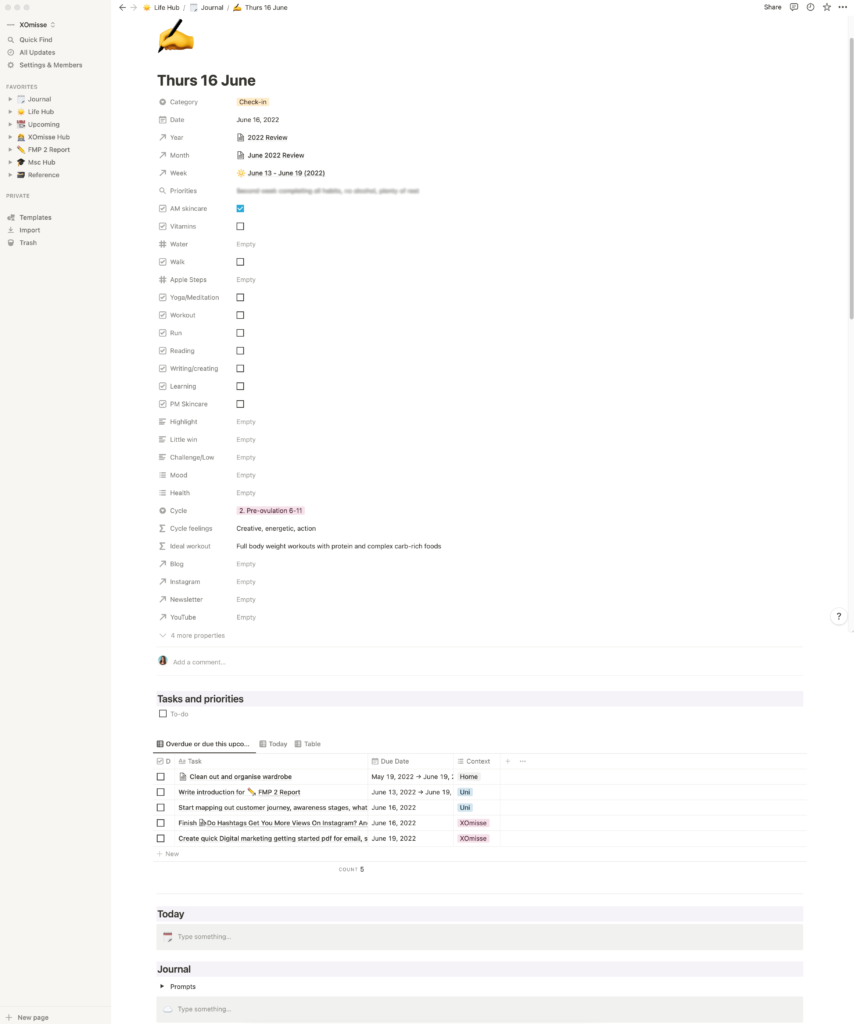
Now getting onto my main section, first up is my life hub. The main “life hub” page acts like a dashboard that gives me an overview of that section. I’ve pulled in my journal database and task list database.
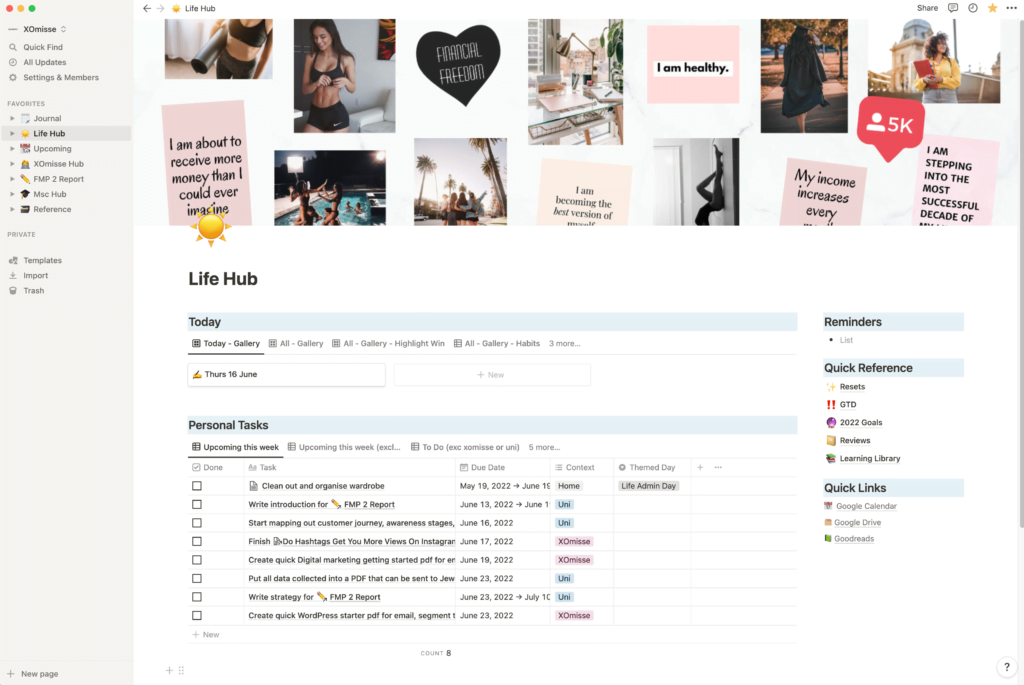
Then on the right, I link to other sub-pages within this section.
- Journal: I create a new page in my journal database everyday, where I have properties set up for different habits, a checklist for quick tasks and embed my master task list so I can see what I have coming up. I select the correct week, month and year from those specific databases so I can link the information together.
- Resets: This is just a simple page with text and checklist blocks. I list out all the things I like to do on a weekly, monthly, quarterly and yearly basis. Such as backing up my website, clearing off my phone, scheduling content for social media, etc.
- GTD: This page shows multiple views of my master task list, broken down into what’s due today, what’s due for each context (XOmisse, uni, home, etc.), what’s due for clients and so on.
- 2022 Goals: This isn’t as efficient as my 2021 Goals page, but essentially it contains a database that details my goals for the year along with a counter that tracks my progress.
- Reviews: Contains three separate databases that link to my daily journal, these are my weekly agenda, my monthly review and my yearly review. These help me track my habits, progress towards goals and reflect on accomplishments and improvements.
- Learning Library: Here, I embed my library and sticky note databases from the reference section.
XOmisse Hub: Small business and content creation
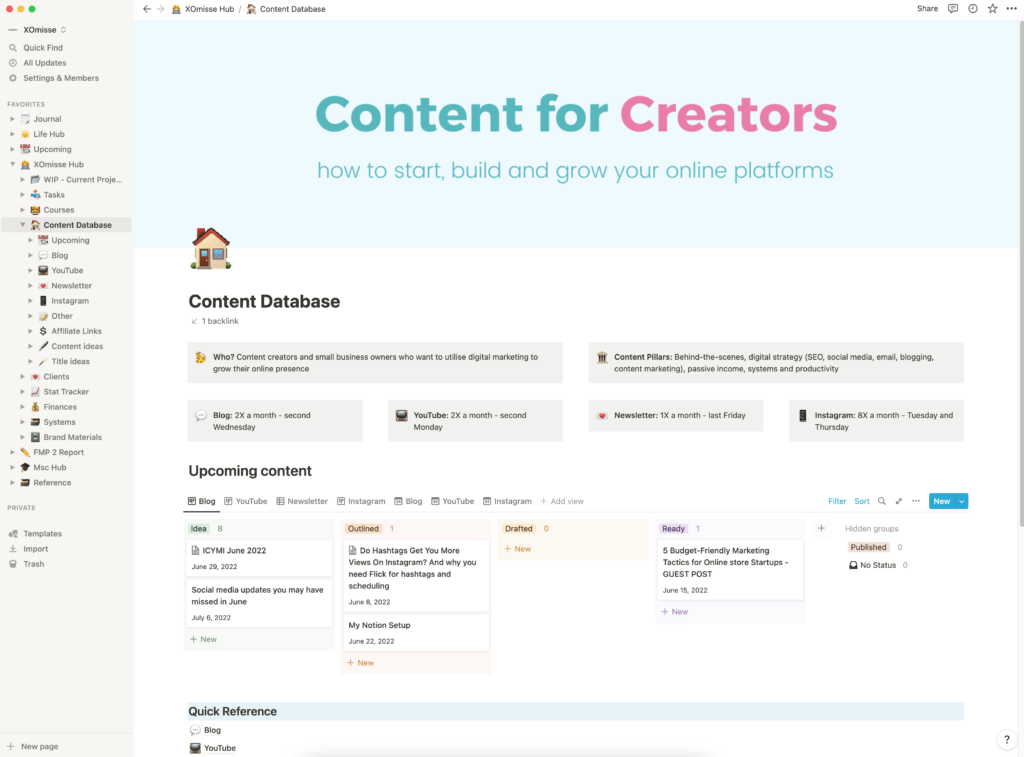
Moving on to the XOmisse hub, the main page shows my WIP database for projects I’m currently working on and again, I pull in my task list which is filtered to just show tasks with the ‘xomisse’ context property. Along with some other blocks to remind me of my goals, my themed days and quick links to my Google Calendar and Drive.

I have many other sub-page and databases within this section, including:
- WIP: Like mentioned above, this is a database where I add projects I’m working on or link to the current client or course I have on currently.
- Tasks: Again, this is a list of tasks with the ‘XOmisse’ context
- Courses: Which is a database detailing the courses I’m currently putting together, which tracks the status and progress of those
- Clients: A database of clients, with information about the projects, status and so on
- Stat Tracker: A database that collects my website and social media stats each month so I can keep track of what’s working, how often I published content, etc.
- Finances: The income and expenses I have in my business
- Systems: The processes I use for different activities, such as my blog post process. Having these in place makes it easier to delegate later.
- Brand Materials: A database that stores my vision, mission, elevator pitch, brand colours, logos, etc.
Then we also have my content database, which is essentially my content calendar. I store all of my content so I can track it from idea to publish, figure out what’s being posted on what platform and when, and what’s due when.
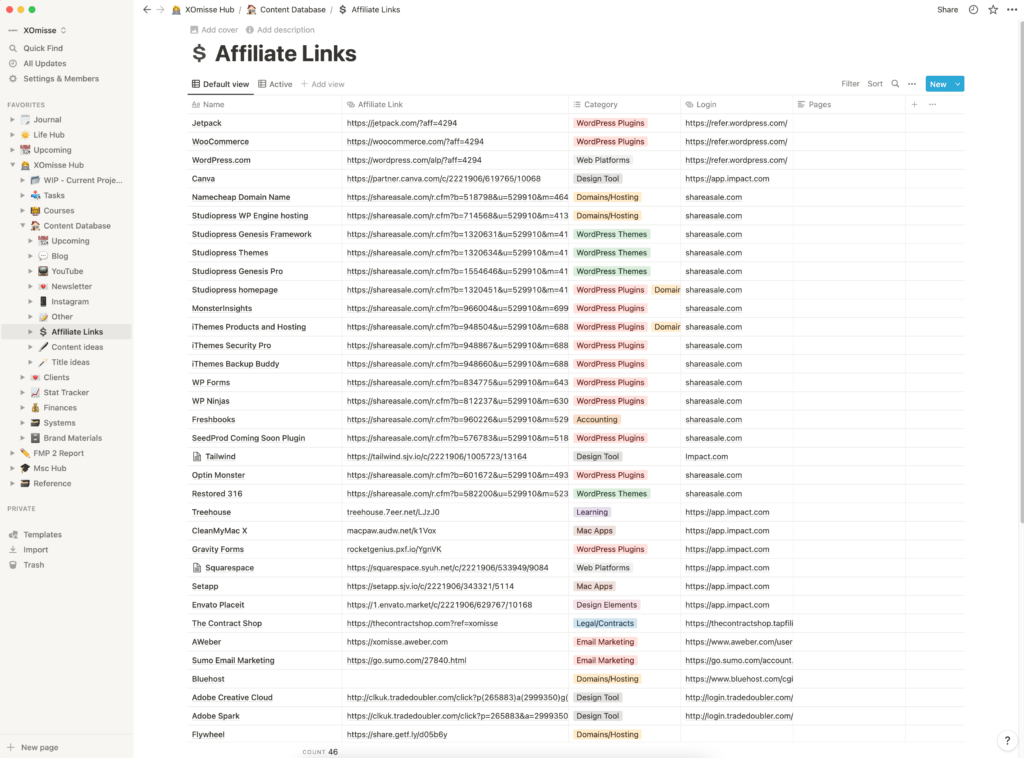
I also have an affiliate database, to store my affiliate links and login information which makes it easier to organise. It also means I can link to a related affiliate within my content calendar to remind me to mention that brand when I’m writing.
MSc Hub: Tracking assignments and deadlines
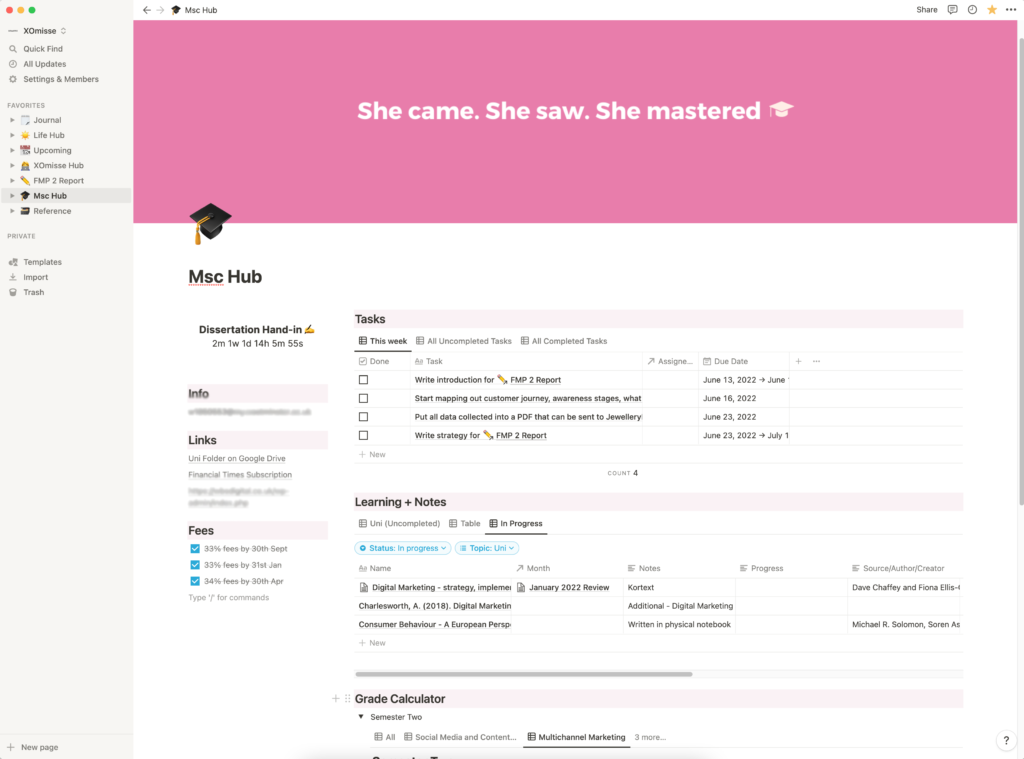
Finally, moving on to my MSc hub. There’s not a whole lot going on in here because my master’s is only one year long, I didn’t want to spend too much time setting this up. I again embed my task list which is filtered by the ‘uni’ context to only show tasks related to my degree. I also embed the library database again, which shows my recommended reading list. And finally I have a grade calculator to keep an eye on my average grade.
Conclusion
So that is my Notion! I know it seems super overwhelming, but Notion can do so much so my advice if you want to use it is to get in there and have a play around, see what it can do and start figuring out how to make it work for you.
I’m eager to do more Notion content, so let me know if you want me to create a more detailed video about how to set up certain sections or if there’s something in particular you want to see a deeper dive on… like setting up a content calendar for example.
