Today’s tutorial is all about the “read more” jump link on Blogger. I’ll go through how to add it to your blog, change the text, add the post title, add an image and customise the look of it.
The default “read more” link doesn’t really stand out and let people know that there’s more to the post which is why most people like to change it. There’s so many ways to customise this so try out a couple and see what you prefer.
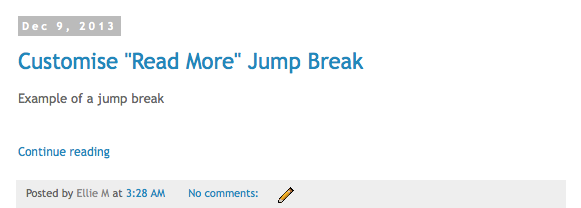
How to manually insert a ‘read more’ jump link in a post

When writing a post in Blogger, click the little broken page to insert a “read more” jump link.
How to change the jump link text
Go to Layout > Blog Post > Edit > Main Page Options and change the Post Page Link Text.
You can alter the text manually in your HTML too. To do this go to Template > Edit HTML > Search for jump-link and find the following code
<b:if cond='data:post.hasJumpLink'>
<div class='jump-link'>
<a expr:href='data:post.url + "#more"' expr:title='data:post.title'>
<data:post.jumpText/>
</a>
</div>
</b:if>Change <data:post.jumpText/> to whatever you want to appear like Read More or Continue Reading for example. Save your template.
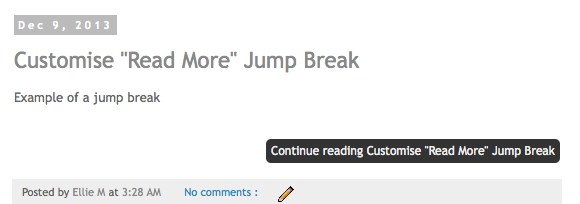
Show post title in the jump link text
To add the title of the post after the read more text go to Template > Edit HTML > Format Template. Search for jump-link and find the following code
<b:if cond='data:post.hasJumpLink'>
<div class='jump-link'>
<a expr:href='data:post.url + "#more"' expr:title='data:post.title'>
<data:post.jumpText/>
</a>
</div>
</b:if>Add <data:post.title /> after <data:post.jumpText/> so it looks like
<b:if cond='data:post.hasJumpLink'>
<div class='jump-link'>
<a expr:href='data:post.url + "#more"' expr:title='data:post.title'>
<data:post.jumpText/> <data:post.title />
</a>
</div>
</b:if>Save your template
Remove the auto-jump to after jump-break
After clicking “read more”, the page reloads and jumps to the line after the jump-break. If you want to remove this so it loads the post normally, go to Template > Edit HTML > Search for jump-link and find the following code
<b:if cond='data:post.hasJumpLink'>
<div class='jump-link'>
<a expr:href='data:post.url + "#more"' expr:title='data:post.title'>
<data:post.jumpText/>
</a>
</div>
</b:if>Remove + "#more" so you are left with the following code…
<b:if cond='data:post.hasJumpLink'>
<div class='jump-link'>
<a expr:href='data:post.url' expr:title='data:post.title'>
<data:post.jumpText/>
</a>
</div>
</b:if>
Save your template.
Add image, icon or button instead of read more link
There’s quite a few ways to do this, but here is a really simply way. Go to Template > Edit HTML > Search for jump-link and find the following code
<b:if cond='data:post.hasJumpLink'>
<div class='jump-link'>
<a expr:href='data:post.url + "#more"' expr:title='data:post.title'>
<data:post.jumpText/>
</a>
</div>
</b:if>Replace <data:post.jumpText/> with <img src='DIRECT IMG URL' /> so that it looks like this
<b:if cond='data:post.hasJumpLink'>
<div class='jump-link'>
<a expr:href='data:post.url + "#more"' expr:title='data:post.title'>
<img src='DIRECT IMG URL' />
</a>
</div>
</b:if>Now replace DIRECT IMG URL with the direct image source of the image you want to use and save your template.
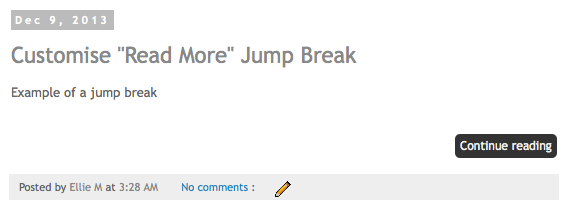
How to style the “read more” link with CSS
To keep the link but make it suit your blog design go to Template > Edit HTML and find ]]></b:skin>, if you’re having trouble find the b:skin tag, check out this post.
Add the following above ]]></b:skin> and add your styling in between the brackets.
.jump-link {
/* Style Entire Jump Link */
}
.jump-link a {
/* Style Jump Link Text Link */
}
.jump-link a:hover {
/* Style Jump Link Text Link On Hover Over */
}
For example, you could use something like the following (or from our post on how to style a link to look like a button)
.jump-link {
text-align: right; /* align right of post - can also use left or center */
background: #333333; /* change background colour for full width of jump link */
}

.jump-link a {
background: #333333; /* change background colour for just the text part */
color: #eeeeee; /* change text colour */
padding: 5px; /* change spacing around text */
border-radius: 5px; /* change radius of background */
font-size: 12px; /* change font size */
}

.jump-link a:hover {
background: #eeeeee; /* change background colour on hover */
color: #333333; /* change text colour on hover */
text-decoration: none; /* no text underline on hover */
}
which will make it look similar to the following
Make sure you aren’t missing any colons, semi-colons or brackets in your CSS! Any errors will stop the browser from reading it correctly.
141 responses to “How to customise the read more jump link on Blogger”
This is my new favourite website. Adding it to the blog roll. Thank you for making this so much easier!
Awh thank you Katerina 🙂 if you have any questions or requests, please let me know!
Hi hi, I just wanted to say THANK YOU!! I basically spent an hour (or maybe two) on here going through tutorials and modifying my blog, this is all thanks to your wonderful easy-to-understand tutorials that I can make my blog look somewhat professional!! YOU’RE AMAZING!!
Awh thank you, very happy to help 🙂 x
Hi Ellie,
Thank you for this tutorial. It didn’t work for me. Not sure what I did wrong but I also tried another tutorial and the code appeared at the top of my blog instead of changing the read more link,
I pasted it between title and ” ” but there was no ]]> in front of it.
Also, I wanted to ask. Is there any way when you are putting notes within the code that you could differentiate it by using a different colour and pasting it outside of the code? I sometimes cannot tell when you are noting something or when it is code, for instance where you state “change background color” within the code format.
Any thoughts about what I’m doing wrong?
Thanks!
Hello, You’re adding the code to the wrong place in your template. It should be before
]]> </b:skin>not under the title tag above<b:skin>. The<b:skin> ... ]]> </b:skin>section is your CSS. I will take your feedback into consideration, thank you. Notes are always placed within/* */as a web standard and need to be within the code itself, code to be changed is usually colour coded but will try changing the colour of notes also in future tutorials 🙂Thanks so much, Ellie. That’s the only code containing the word “skin” when i go to edit html (i did click on the code before ctrl-f). I also searched for the word “jump” and right above it was b:if
Am I even looking in the right place?
Oh hold on which part are you doing? What I said above was for the CSS? There’s definitely two
b:skinin your template as one opens the CSS and one closes it 🙂 Make sure to click format template before searching also 🙂ahhhh, found it. had to expand the code. so complicated!
THIS WORKED!!! THANK YOU!
No problem 🙂
Can you halp me to remove blogger’s “read more” jump link…bcoz template i downloaded already has “read more” link…
you can check my site so you can see what i mean…
btw, i just made the site so it looks ugly xD
Hello. I can’t be much help without seeing the template myself but take a look at this post on creating post excerpts. Your template probably contains similar code so try find the related code and revert it using the tutorial as a guide.
Your blog is so helpful! I’ve just added this jump link to my blog as I think it’s a great way for the visitor to see a few of your posts.
The only thing i’m finding tricky is changing the font or the size etc of the ‘continue reading/read more link so that it stands out a little more. I’ve tried finding ]]> but I don’t seem to have it on my html so can’t change it. baaah. I have b:/skin but not the ]] bit before. Any idea why this may be? Have i maybe deleted it by accident? I’ve tried just adding it to the b:skin bit but nothing happens.
Thanks so much 🙂 xx
Hello Julia, thank you so much. You definitely have
<b:skin> ... </b:skin>as this is what houses your CSS. Check out this post for help finding it. The ]]> bit before the end may be at the end of your CSS beside the last bracket or may have been deleted. I can’t check that from here. You may have to click on the black arrow at the numbering on the left of the editor to fully expand this section. You could always add the CSS to the Template Designer which will place it in your Template. To do this go to Template > Customise > Advanced > Add CSS and paste the CSS here just once, then click enter and save. Let me know how you get on with this.This worked for me but it now has two jump links, the one that says “read more” and now the one i customized. how would I get the one I customized to be where the original read more is, and how do I take the original jump link “read more” off?
What’s your URL so I can take a look at the code to see why it’s appearing twice.
dear how can i change the name of buttons in blog? for example i want to change the name of ABOUT in blogger. how can i?
What buttons? Do you mean in your navigation? It’s depends what they are – typically it’s page so you can change the page names.
Ellie,
I have a problem I can’t seem to solve.
I follow these steps, “You can alter the text in manually in your HTML too if you wish. To do this go to Template > Edit HTML > Format Template. Search for jump-link and find the following code”
But there is no “jump-link” or jump anything in my template.
I’m not sure how I can have jump-links in my posts but nothing about it in my template.
Any ideas?
Gratefully,
Dawn
Hello Dawn, it should definitely be there. Try searching for
jumpor#moreinstead. If you’re having a hard time finding anything check out this post on how to properly search for code in Blogger HTML Editor.Thanks for the great instructions! I followed your “style the read more link” and it worked, but I am wondering how I can write the code to increase the font size and change the link color? I want it to be more noticeable. Thanks!
In between the brackets of
.jump-link a { }, addcolor: #HEXVALUE;to change the colour andfont-size: NUMBERpx;to change the font size. You’ll find list of hex value colours here. Hope that helps!Hi! Thank you so much for your helpful tutorial. So I too am trying to change the size and color of my font but can’t quite figure out how to do it based off of what you said above.
I tried to copy/paste my code, but it wouldn’t let me. Anyway, I don’t have the little {} brackets next to my .jump-link. So can you help me again know where to add the color and font size code? Thanks!
Hi, you add
.jump-link { }to the CSS yourself (above]]></b:skin>in Template > Edit HTML) and then addfont-size: 14px;andcolor: #333333;in between the brackets. You can then change14and333333to customise the colour and font size. Hope that helps!p{.jump-link {font-size: 14px;color: #333333;}
]]>
Thank you for your reply!
So this is what I did, but it’s still not working.
Hello Middy. You can’t have a rule-set within another declaration (see here for reading and writing CSS), so instead of
p{.jump-link {font-size: 14px;color: #333333;} ]]>it should readp{} .jump-link {font-size: 14px;color: #333333;} ]]>. Or without thep{}if no styling is needed there. Make sure all brackets are properly closed. You have a handful of errors in your CSS which may cause the browser problems when trying to read your styling rules. Hope this helps, please let me know!OK so it is *mostly* working. Which is great! I have successfully changed the font size and alignment. BUT for some reason when I go to change the color, it changes the color of my link at the bottom that say “You Might Also Like.” Not sure why it’s doing that when both the font and alignment only change my jump-link. Here’s the code:
p{} .jump-link{text-align: left;font-size: 16px;color: #393939;}]]>
Hi Miggy, glad that’s working now for you. As you can see in this screenshot your Linkwithin widget is inside the jump-link div in the HTML of your template. That’s why it’s taking on the CSS for
.jump-link. It’ll have to be moved to underneath the end div and before starting.post-footerdiv.Ellie,
I got it figured out. I was making a rookie mistake or having no clue how to search my template.
Thanks,
Dawn
Hi,
I have put in the code for a add image instead of read more link but how do I change the image?
Thanks
Zabelle
Hello, upload your image to an image hosting site such as Photobucket, Flickr, Blogger, Google+, Dropbox, etc. You’ll get a direct image link from there, use that to replace DIRECT IMG URL in the code.
Thank you!
I have tried that and uploaded my picture to photo bucket and replaced the code but the picture comes up at a little question mark for some reason.
Do you know any reason why that could be?
Thanks
Make sure the image is set to public on Photobucket
Okay so i have tried again and the picture has come up but when i click on it it leads me to the photo bucket site?
Make sure you’re using the direct image url and not the page url 🙂
Hi Ellie,
You have such an informative blog and I find the tutorials so simple and well explained to follow as well. Thank you very much for this hack. It works like a charm.
Thanks for the informative post! Just wondering for a jump link image, can you make it so it changes when you hover over it (like the rollover effect)?
Yes you can, here are some tutorials rollover effects.
Hi!
This is so useful, thanks so much. One last question, how can I make the edges of the background of the ‘button’ so they’re a rectangular shape, rather than rounded corners?
Thanks so much!
Carly
Hello Carly, find
.jump-link aand removeborder-radius: 30px;🙂Hi, I am trying to change my jump link so it stands out more but when I search the ]]> there are no results on my HTML – why is this and what do I do? It’s such a pain! Can I add it do you think? I’m just not sure where!
Thanks so much,
Julia
Check out this post for help finding it, it’s definitely there 🙂
I followed the instructions and can’t get the image to work to replace the text. Any tips/thoughts?! Thanks!
Katie
Hello Katie. Make sure you’re using the direct image url and not the page url.
I’m having the exact same PROBLEM AS KATIE.. I AM DEFINITELY USING THE DIRECT LINK AND HAVE CHECKED ALL OF MY CODING TO MAKE SURE IT’S RIGHT BUT STILL CAN’T GET IT. TRYING TO FORMAT MY NEW BLOG… thanKS SO MUCH!!
Hello Laura, you’re using post excerpts so it’s slightly different. Check out step 3 in this tutorial to see what to replace.
I think i am also using the post excerpts, that sounds familiar. I use blogger also. I will try that and see if it works. Thank you.
Please check out my site and let me know if that’s what I have?
Hey Katie. Yes it’s the same, sorry I didn’t spot that earlier! Check out step 3 in this tutorial to see in full detail, you need to replace
read moreorread more "<data:post.title/>"in the post excerpt code with the image code as shown above. Let me know how you get on 🙂Katie – I figured out why the image wasn’t working! Search for: read more. Then replace that with the IMG link! That worked for me at least 🙂 Found it here: http://www.eliteblogpress.com/2013/11/replace-read-more-link-image-button.html
THANK YOU! this was so helpful!!!
Hi! I tried the style the “read more” link on this tutorial and it didn’t work! I don’t know what I did wrong but I tried using the other codes from other tutorial sites and they also didn’t work! I don’t know what I did wrong! Please help??
xx
Sarah
Hello Sarah, the only CSS you have for the jump link is for it to be centred which is working. I can’t really help without seeing the code in place. How are you trying to style it, what do you want it to look like?
Hi! I wanted the jump link to have a black background that’s as wide as the post page… I don’t know why the codes aren’t appearing, I didn’t remove them when I attempted to do this tutorial.. 🙁
Checked your code again, you’re missing a bracket. Go to Template > Edit HTML and find
</b:skin>, then above it findnrelate { margin-left: 10px !important;and add a}to the end, before the code for your jump link. Remove the code you have between.jump-link afor background, padding and border-radius and add that code to between the brackets of.jump-linkinstead so it spans full width of the post 🙂It worked! yay! Thank you! 🙂 last question, how can I change the color of my “read more” sign? I changed it to white on the code but it won’t turn white.. If I try to change the color of the links in the ‘customise’ tab, it changes but it also changes the color of all the links on my blog.. 🙁
.jump-link a { color: #ffffff; }🙂It worked! thank you! thank you! 🙂
I have a last question, I hope you don’t mind! Do you know how I can align my post footer to the left? I found a code somewhere online but it won’t align them properly, the “labels” part is too far from the “comments” part in the post footer both in space and indentation.. Also do you know how to capitalize all the labels so that they all look the same? Sorry if this isn’t about jump link anymore but I’ve tried to look everywhere online for tutorials for it and I haven’t found one! 🙁 if you can help me with my last comment, can you teach me how to move the post footer to the left most side, in line with the background of the jump link? thank you! 🙂
Thank you so much for helping me! 🙂
No problem 🙂 to remove the indent use
.post-footer-line>* {margin-left: 0px; }, to make labels all capital use.post-labels { text-transform: uppercase; }and to align the post footer with jump link use.post-footer {padding: 5px 0px;}. Add those three codes to your CSS above</b:skin>I think I did something wrong again.. 🙁 It won’t work.. 🙁 the words comment and label still won’t align properly..
Try also adding
margin-right:0em;to the brackets of.post-footer-line>* { margin-left: 0px; }I just want to let you know that it finally worked! very last question though, how to I lessen the space between the label and the comment??? thank you so much! 🙂
The post footer is split up into different lines, Labels is on post footer line 1 and comments is on post footer 3. Theres nothing on post footer line 2 which is why it looks like theres a gap. So the best way to reduce the gap is manually moving the comments to line 2, here’s a tutorial for that 🙂
Hi! thanks for your help! I was able to do the them properly! I just noticed now, my archive list at the side bar lost its arrows, how do I get those back? or how can I fix that? thank you so much! 🙂 So sorry if my questions are no longer related to this tutorial! I just don’t know who to ask for help anymore! 🙁
Find
#ArchiveList .toggle .zippy { font-size: 0px !important; }that you added above</b:skin>and remove it 🙂Hi!
For my jump link, I use an image but I would like to change it so that when it hovers over it italicizes (still using an image). What code would I use for the hover bit w/ image source?
Thanks!
Hello, method 1 in this tutorial will show you the code to add to the image tag for a hover over button 🙂
Hi! This is so awesome Thank you so much!
I am new to blogging.
I found my blogs template and i really loved it a lot.
Only the problem is ” Read More ” button in the posts..
When i click it, its redirecting to default link in the template and i don’t know how to remove it.
Pls help???
Hello. There’s no link for the read more button in the template, either it was accidentally removed or isn’t included in the template you got. That’s why the page is just refreshing. To fix it you’re going to have to manually add it in. See the heading “CHANGE JUMP LINK TEXT” in the tutorial above, use that as a guide. Find the code
jump-linkand you should find a similar code to whats shown. Add theexpr:href='data:post.url + "#more"'part in place ofhrefand that should work then.Thank you! It was very helpful. 🙂
Thanks so much for this tutorial and the others you posted! You have helped me improve the look of my blog 🙂
Thanks
Thank-you for all your great tutorials! They are so easy to follow 🙂
I just have one question: I tried to change my jump-link from a text to an image. I uploaded my image to flikr and followed to steps you presented here. It all worked out except, that the image wasn’t shown, all that showed up was a question mark – you know the ones that show up when an image can’t be displayed. 🙁 Do you know what the problem could be?
Make sure the image is public and that you are using the direct image url, not the page url 🙂
Excellent post! This was extremely helpful and easy to understand. I was searching for a way to redirect/remove the auto jump in my posts and was happy to find it explained here so simply. While I was at it, I created a custom Read More button thanks to your advice…didn’t know I could do that! Blogger can appear so limiting sometimes…this is invaluable information. Will be following you from here on!
Used your jump link customization and love it. Only one question…how do I either center put to the right…can”t seem to figure that out. PS…also used your post on inserting a line between posts….love love love it…you da bomb 🙂
Hello Diana, thank you. To display it on the right add
.jump-link {text-align: right;}or to centre it add.jump-link {text-align: center;}.Hi,
Thank you very much for this! It has worked- however the ‘view full post’ isn’t thick enough? I would like it to be bigger the border? Can you help with this at all please? I have tried to change the border margin but it is not working for some reason.
Thank you:)
Hello Kerry. Add a padding value to
.jump-linkto increase the size of the button.Hi!
Is there a way to apply blogger’s default jump break or read more to ALL the blog posts at once? I want to add it to all my posts, and then customize it by adding my own Read More image. Is that possible? I have about 300 posts in my blog right now.
Hello, yeah I have a tutorial on that here.
Oh yes, I’ve seen this post! In fact I tried it out too but this is to create a thumbnail and a post snippet. Unfortunately all my images aren’t the same size (some horizontal, some vertical), so no matter what dimensions I give, a few end up being “stretched”. I couldn’t figure out how to auto-adjust the sizes. Which is why I was specifically looking at adding blogger’s default jump-break to all the posts, as that would eliminate the problem of image size adjustments. I guess there is no way to add it to all blog posts at once.. is there?
You can change
img_thumb_height = 200;toimg_thumb_height = '';, that will allow the height to adjust automatically depending on the width. Other than that no there’s no other way to add it to all posts at once.It worked! And it looks so much better now! 🙂 Thank you for your help!
I had another query.. The customize option on my blogger template designer is not applying the changes I am making – like the font and font color changes to the text. It allows me to make changes to the width, layout etc. But when it comes to text, it doesn’t reflect the changes.
I am assuming it is because of some bit of third party code that I added. Is there a way to figure out where the problem is?
The CSS values need to be the corresponding Template Designer code in order to be altered. These are declared in the Variable definitions section at the start of your CSS. You’re missing a closing bracket before the closing of your CSS.
I’m trying to do the same thing but when I change it to img_thumb_height = ”; it doesn’t seem to work and just goes back to displaying the full-size blog posts.
Thank you so much for all the tutorials on here by the way, I’ve been using loads to help add new features to my blog and they’re really helpful! x
Hi Marie, thank you 🙂 replacing the value with
''should work, be careful not to edit / remove any other characters.This worked perfectly! But I was wondering how do I center the image I used for my jump text and also change the padding of it (like the top) because there’s too much space for my liking. Is there also a way to change the hover color to just a less opaque color?? Thanks so much for your website and I’m glad your back at it again xx
Hello Jessica. Thank you! You can add
.jump-link { text-align: center; }to your CSS to centre it. Edit the margin and padding values to adjust the spacing. For the hover, you can use.jump-link a:hover { background: #eeeeee; opacity: 0.8; }.Thank you so much! I was wondering how do you set the jump link automatically after the last word. Instead of having it left/ center/ right align? Thank you again xx
Hello Jessica, if you go to Template > Edit HTML and find
jump-linkyou can remove the div wrap so that just the link is left, you can then move this (along with the conditional tags) to underneath<data:post.body/>.You are now one of my favorite bloggers ever omg. I’m not that knowledgeable about html and all that jazz anymore because I already forgot everything I learned in high school due to lack of interest but all your instructions are oh-so easy! Thank you so much for posting this and for always sharing blogging tips!
Awh thank you so much Roxanne 🙂
Hello Elaine, I’ve just found your blog and it is so unbelievably helpful, thank you so much!
I do have a question, I’m really sorry if this has already been answered but if you could help that would be great:
I want my jump link to be text centred in a shaded box, and the box to be the same width as the Footer section underneath.
At the moment I’m using an image that I made, and I just guessed what the width should be, but it is actually a couple of millimetres too short. (The kind of thing that only I would notice but it really bugs me.)
So is there a way to either (A) find out the exact width of the footer section, and make a new jump link image of the same width, or (B) delete the image, and use code to make the text background automatically extend to the meet the edges of the other text/footer/etc ?
–I think I would prefer (B) but I don’t know!
Thanks x
Hello Amy. If you apply the styling to
.jump-linkinstead of.jump-link ait will be the full width of the post.Hi! Thank you so much for this post, it’s been so helpful! I’m hoping you could help me with something though. I have added an image instead of the generic “read more”, but it is very close to the preview text. Is there any way to add a gap between the text and the image? Thanks!
Hey Alicia, yes you can use a margin value to sepearte them. I explain margins in this post. Hope that helps!
working good in my site and I change a litle in style.
Thanks .
Nice! Thanks for share this!
This is just what I needed to learn. Thank you SO much!
Hey Xomisse! I’ve used this tutorial and it’s worked for me with no problem, but now that I want to include a jump break again on my blog. I’ve run into a weird problem. For some reason when I go to customize my jump link, it customizes my engageya related posts widget as well. So for example, if I add a border or something, it adds the border to the widget as well. How can I edit this so that all my customizations are done to my jump link alone. Right now I have an un-edited version of a jump-link on my “The Tragic Age” post.
Hello Tika. The engageya widget is within the div of your jump link. You’ll have to remove it from the jump link div and place it outside of the closing div tag in your template to fix this.
I figured that was the problem! Do you think I would have to edit this within the HTML widget of engageya? Or my HTML post within compose whenever I add in the jump-break?
It will probably have to be in the Template itself (Template > Edit HTML)
Hi, I tried to do this but it did not work. I did it in the HTML and in the add CSS neither worked. I put this is:
.jump-link {
text-align:center;
background: #333333;
font-size: 15px;}
Nothing. Help?
Emily
X
Hey Emily. The code you gave above is in the media query for screen less than 320px which is why you aren’t seeing anything happen. You also have some reaccuring / conflicting CSS in your template and a couple of errors that could be blocking the CSS from being read correctly. Hope this helps!
This tutorial was so helpful, and was very easy to follow too. However, I was just wondering how you make the width of the jump link button the same width as the post section, like done at shewearsfashion.com
You can apply the CSS (background, border, padding, etc) to
.jump-linkinstead ofjump-link a. That will make it the full size 🙂Hi Xomisse! I am wondering how you can customize read more so that on your home page your latest blog post is shown entirely but the older blog posts say read more. So that every time you post a new blog post it shows fully and the older ones say “read more”
Thank you!!
Hello, yeah you can adjust this post using this method to make it only apply to posts that aren’t the most recent.
Hi there. I can’t remove the auto-jump. I deleted the +"…, but it still jumps to the line after the jump-break. What am I missing?
Never mind. It is working now. Must not have refreshed my screen. Merci!
Thank you so much! This helped me!
really good tutorial, thanks a lot, i used it on my blog
Hey! Thanks for the tutorial but it doesnt work on my blog. I tried the codes from other websites too but it keeps giving the same error: “More than one widget was found with id: HTML3. Widget IDs should be unique.” What should i do about it?
And i tried to put instagram follow image on my sidebar. It was supposed to go to my instagram profile through the link instagram.com/smektepli but it puts my blogs adress first ant it becomes like this smektepli.blogspot.com/instagram.com/smektepli. And ofcourse it doesnt work 🙁 Can you help me about these? Thanks so much!
Hello, we are not adding a gadget in this tutorial so the error is from previous code – it means that there are 2 gadgets in your template that have the same ID. Go to Template > Edit HTML and use the dropdown menu to select the gadget in order to change one of there IDs. For the URL make sure you’re using the full URL which includes
http://beforeinstagram.com/.Hi Ellie, I thought I’d add my thanks for your really helpful and informative post. I liked the way you set up the jump link in your example, so I’ve managed to pretty much clone what you did. Fantastic explanation, and made it much more obvious to my small non-techie family audience that there was more stuff to read after the jump! They were missing it all with the tiny default Blogger “read more”.
Cheers!
Hey Gary, thank you so much for your comment. So glad you found this post helpful 🙂
Hey,
i can’t find the following code:
in my html from blogger, i did post a post with the read more jump link on it. What can i do?
Hi Lotte, can you please use a Gist to share the code as I can’t see it within the comment. Thank you.
Hi there, this is very helpful! However, is there a way to change the default image so that the width is given (for example my width would be 580px) but the height could be automatically determined based on the original image size? Whether its landscape, portrait or square? Thanks you!
Kristy – style-blueprint.com
Hey Kristy, yes give the image a fixed width (
width:580px;) and auto height (height:auto;).YOU ARE THE BEST!!!
I LOVE YOUR WEBSITE!
DEFINITELY MY GO-TO SITE WHEN I FEEL LIKE FINE TUNING MY BLOGS APPEARANCE.
THANKS FOR THE GREAT INFO!!!
How can i make the read more IMAGE centred?
Hello, add
.jump-link {text-align: center; }to your CSS. That should center it 🙂Thank you sooooooooooooooooo much. I’ve been looking for a correct tutorial for hours and I finally found yours that worked wonders for me. Thank you again sweetie
Thank you for your awesome resources! Would you know how to adjust the template or gadget so that the added gadget LINK WITHIN appears only after you have clicked read more and not on the home page?
Thanks!
Hey Christine, check out this post for instructions on how to add related posts to single posts only.
This worked perfectly!
Just one question, I added code that puts my tagline at the end of all my posts and it shows up above the read more button. Is there a way that I can keep it from showing up there? It distracts from the read more button.
Thank you so much!
Hi Natalie, I’m so glad. Yes, you can use a conditional statement to make it only show at the end of the single post and not on the homepage.
Thank you So Muchhhhhhh !!! :))))))))
Thank you so much! This greatly helped me to easily add an image for my “Read More.”
– Grace from http://www.TheGracefulMist.com
This website has helped me a lot…thanks a ton buddy 🙂
I was wondering if it was possible to customise the read more text in one post only. Thanks in advance.
P.S. I love your website 🙂
Hi Sonia, thank you so much! You could possibly use conditional tags as a workaround, but would be a lot of effort.
hey admin,
I want to add an external website link to my read more button below each post separately. It can be added while creating post individually. how to edit codes. please advice
Hi there!
I want to first say that your website is so amazing and so helpful.
I know all the DIYers out there are so grateful you put all these tutorials up!
So THANK YOU!
I was wondering…
Is it possible to make what is seen on the home page before the jump link custom?
Meaning… in my post, all my pictures are first, then all my text is after my pictures. So I just put the jump link after the first photo. But, I would love on the home page to have a photo and some of my text, but without having to actually have the text right after my first photo.
Does that make sense?
Would love your input!
Thanks so much!
xo
Taylor
Thank you so much! I’ve been searching for this tutorial a long time ago and finally I found it! Thank you again! I’m beyond happy!
I am creating a blog in which I want every post to be one complete paragraph, sometimes a long paragraph. Is there a way to customize the Jump Link in Blogger so that there is no line break? That is, I’d like to insert the Jump Link and have it take the reader to the complete post, which remains one complete, unbroken paragraph despite there being a Jump Link in it. Is there a way to do this?
Thank you!