Did you know that you can use your browser to tweak elements of your site without making any permanent changes. This is a great way to get familiar with your theme’s structure and CSS.

How to enable developer tools on your browser
- On Safari, go Safari > Preferences > Advanced and enable “show develop menu in menu bar”. Now you can click Develop > Show Web Inspector
- On Chrome, go to View > Developer > Developer Tools
- On Firefox, go to Tools > Web Developer > Inspector
There are also shortcuts for this, depending on the browser and operating system you are using. From here you can choose the inspect element tool. This is a target icon in Safari for example. If you prefer, you can right click on an element on your site in most browsers and select Inspect, Inspect Element or something similar.
Use developer tools to test CSS changes
In the styles panel on the right of the developer tools, you can edit existing properties or values, add new declarations and add new CSS rules. You can also enable or disable a declaration by clicking on the checkbox next to it.
If you have an element selected in the HTML panel, you can click the plus icon (+) in the style panel to add a selector for the currently selected element.
The video demo below will run through how to select an element on your site and add CSS to change the styling of that element.
Let’s break down another example…
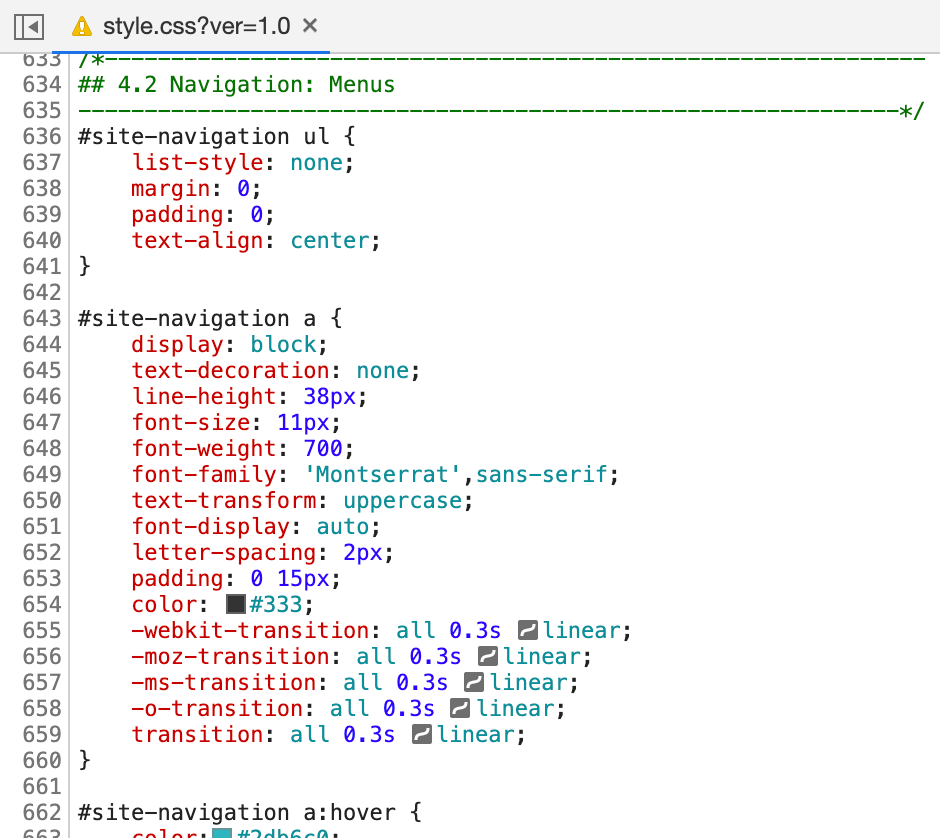
We’ll start by selecting an element on your site. The image below shows me picking a navigation menu item. As you can see the HTML markup shows up on the left, while the corresponding CSS is displayed on the right.

From this I can see that my navigation ID is #site-navigation, so to target the navigation link we use #site-navigation a. From here we can edit the CSS for the text case, text colour and text spacing.
Remember that Classes use periods (.) while IDs use hash (#)
Making changes permanent
Now that we have tested what we wanted to change and can see that it’s working, we can move on to making the changes in our theme’s CSS file.

We’ve actually picked up a lot of information from the developer tools:
- We know the ID or Class that we need to use as the selector (find our what a selector is in my read and write CSS post)
- We know that the existing CSS in in the file named style.css file (depending on your theme and active plugins, you may have more than one stylesheet)
- We also know what line that CSS is on (it’s written beside the filename above and along the side in the main editor below)

So we can add our changes in one of the following ways (these options may depend on your theme)
a) Open our CSS file under Appearance > Editor
b) Add custom CSS under Appearance > Custom CSS
c) Add custom CSS under Appearance > Customizer > Additional CSS
d) Or open our CSS file in a Text Editor using FileZilla
When you have the correct file opened, you can search for the selector (in this case #site-navigation a) and make your changes. Now these changes will appear live on your site.
What next?
I recommend having a play around with developer tools to see what you can do with different sites across the web. You’ll be surprised what you start to pick up!
I know it can be overwhelming and confusing, but don’t forget that HTML, CSS and everything else are coding languages. Just like learning Italian, French or Spanish, it will take time and practice.

Looking for more lessons?
I’m launching in-depth courses to teach you how to design, code and optimise your WordPress site. Want to know when they launch? Sign up below!
(You’ll also receive access to my free downloads AND helpful emails every two weeks with WordPress, SEO and blogging tips.
