You’ve chosen your domain, purchased your hosting and installed WordPress. You’ve logged in and made it to the WordPress Dashboard. Now what?
While it’s tempting to go straight into creating content, working through this checklist will have your site setup correctly, which will benefit you when it comes to usability, speed, SEO and keeping your site secure.
Here are 35 things to do after installing WordPress to make sure your site is optimised and ready to be launched.
This post contains affiliate links, which will be clearly marked. If you click on these links and choose to purchase something, I may receive a commission at no extra cost to you. I only recommend products and services that I trust to be useful and of high quality, whether an affiliate relationship is in place or not.
General settings
1. Add a coming soon page
If people are going to be coming to your domain before you’ve fully launched, it may be a good idea to set up a coming soon page to great them while you’re working behind-the-scenes.
To do this, go to Plugins > Add new and search for “coming soon”. I recommend CMP – Coming Soon & Maintenance Plugin by NiteoThemes or the Minimal Coming Soon & Maintenance Mode – Coming Soon Page by Web Factory Ltd. Click install now and then activate.
Once activated you’ll need to go to the plugin settings and enable the coming soon page. You can also customise the design of the coming soon page.

2. Add your site title and tagline
Add your site title and tagline under Settings > General. Your tagline should be a short concise description of your site (“budget travel for solo backpackers”).
3. Add your site icon (favicon)
Your Site Icon (or Favicon) is the little image that appears next to your website title in the browser that helps users identify your site.
You’ll need to create a square image that is at least 512 × 512 pixels. Then login to your admin dashboard, visit Appearance > Customise > Site Identity. Under this you can add your image to the Site Icon option.
4. Change language, date & timezone
To change the language, timezone, date format and time format, go to Settings > General and select your preferred options.
5. Check your permalink settings
Permalinks are the way your website URLs are structured. You’ll want to set your permalinks to a search friendly format.
To choose how your post URLs are generated, go to Settings > Permalinks. From there you can choose how you want your URLs to look. I recommend choosing Post Name as it’s easier for visitors and search engines to understand.
If you’re moving from another blogging platform and planning on redirecting posts, you’ll want to keep the permalinks the same as your old site.

6. Setup discussion (comments)
If you want readers to be able to leave comments on your blog, you’ll want to make sure this is setup correctly. Go to Settings > Discussion to setup comments on your site. From here you can enable/disable comments, setup notifications and configure comment moderation.
7. Setup search engine visibility
In order to allow search engines like Google to index your WordPress site, you’ll need to allow search engines to crawl your site. In most cases this is already set as default, but it doesn’t hurt to check. Go to Settings > Reading and make sure the Search Engine Visibility checkbox is unchecked.

8. Change email address
Go to Settings > General and Administration Email Address. Make sure this email address is correct and active.
User settings
9. Change your login information
For security reasons, we’ll want to remove the default “admin” account. To do this go to Users and add a new account with administrator privileges. Make sure to use a unique username and password. Avoid using terms like “admin”, “user”, “temp”, “test”, “user1”, your nickname or your blog/domain name.
Once you’ve set up your new account, log out of your current account and log back in using your new account. Go back to users and delete the original account. You can transfer any content associated with that account to your new account.
10. Complete your user profile
There’s certain information associated with your user account, which you can configure this under Users > Your Profile. This includes details such as your password, social accounts, the admin colour scheme and more.
Your username is what you use to login to your site. If hackers can easily work out your username, then all they need is your password. Because of this, you’ll want to protect your username and change how your name is displayed across your site. To do this go to Users > Your Profile and select one of the other options under Display name publicly as.
Your theme may have author bios enabled on blog posts so you may want to fill in your Biographical Info on your profile too.

11. Disable user registration
By default, users can register as subscribers on your site. Unless you know you need it, I recommend turning off user registration. To do this, go to Settings > General > Membership and uncheck the Anyone can register option.
12. Upload your Gravatar
WordPress uses Gravatar to display user photos in author bios and in WordPress comments. Gravatar is a profile image hosting service that allows users to use the same photo as their profile image across millions of website.
Go to the Gravatar’s website and create an account using the email address you have used in your WordPress account. You can then use the email address when writing comments on other sites, so that your image is displayed.

Launch your WordPress site in just 5 days!
My mini-guide will be delivered to your inbox for five days and take you step by step through setting up and launching your self-hosted WordPress site.
Content settings
13. Delete default content
When you do a fresh install of WordPress, it provides some default content. You’ll see a post called “Hello World!” with a comment, a page called “Sample Page” and a plugin called Hello Dolly. I’d recommend deleting these before proceeding.
Some WordPress themes will also install demo content and some web hosts will automatically install plugins, you can go through these and decide what is necessary for you.
14. Configure your homepage
By default, your WordPress site will show your blog posts on your homepage. But you can turn your WordPress blog into a WordPress website by showing a static page on the homepage instead. If you would rather show a static page, create two new pages under Pages > Add New. Call one “home” and the other “blog”.
Now go to Settings > Reading. Under Your homepage displays, select a static page and choose the pages you just created. You’ll now see a blank landing page on your homepage, and your blog posts on the blog page.

15. Set number of displayed posts
Choose the number of latest posts you want displayed on your blog under Settings > Reading and edit the number for Blog pages show at most.
16. Set your RSS feed to Summary
By default, your RSS feed will show your blog posts in full. This means that any service using RSS (like Bloglovin’ or Feedly) will display your entire blog post.
I recommend setting this to show summary instead, as it means people will have to click through to your site to read your posts and it can help prevent people scraping your content. To do this go to Settings > Reading and choose Summary.

17. Setup categories and tags
Categories and tags are ways of organising content in WordPress. Categories tend to be used as general labels and main topics. You should really only have a few categories (and sub-categories if needed) on your site.
Tags are more specific details within a category. You can have a lot more tags (though I recommend keeping them to a manageable amount). Tags are the topics within a post that describe the content and they might link to multiple categories.
You can set these up under Posts > Categories and Posts > Tags on your WordPress dashboard.
18. Setup default category
On WordPress, all posts are required to be filed under at least one category. By default, this is the ‘Uncategorised’ category. Once you have setup categories, go to Settings > Writing and change the default category. You can then go back to Posts > Categories and delete the ‘Uncategorized’ category.
Plugins + Optimisation
To install a plugin on your WordPress dashboard go to Plugins and search for the plugin name, then click install and activate. You’ll see a notification that the plugin has been installed and you can click the button to begin the setup.
19. Setup SEO
Search engines are a major source of traffic for most sites. SEO plugins help to make your site search engine friendly and can guide you through optimising your content. One of the most popular plugins is Yoast SEO, which checks how well your content is optimised for search engines and gives you some guidelines for improving. All In One SEO and The SEO Framework are also popular choices.
20. Setup Google Analytics
It’s likely that you’ll want to collect stats and information about who visits your site. Google Analytics is one of the most commonly used tools for this. You’ll need to signup for an account on the Google Analytics website.
Once you have your account set up, you’ll need to connect it to your WordPress site. You can do this manually by editing your theme’s header.php file to include the script provided by Google Analytics. Your theme may include a built-in feature where you would need to add your Google Analytics Tracking ID.
If your theme doesn’t support this and you don’t feel comfortable editing your theme files, you can also connect it using a plugin like Google Analytics Dashboard Plugin for WordPress [affiliate link] by MonsterInsights. Another good option is Google Site Kit if you want to use a suite of Google insights.

21. Secure your site
Using a WordPress security plugin can help with several WordPress security tasks that would otherwise take a log of time and technical knowledge. My favourite plugins are iThemes [affiliate link], Wordfence and Sucuri Security. You can also use Limit Login Attempts to stop a user from trying to login after a certain amount of attempts.
22. Setup SSL
HTTPS (Secure HTTP) is an encryption method that secures the connection between your browser and the website you are on. It makes it harder for hackers to spy on the connection and steal sensitive information.
When someone visits your WordPress site, a line of communication between their device and your server starts to pass information back and forth. An SSL Cert adds a layer of encryption keeping that information private which is really important if you’re collecting login credentials and credit card details.
In order to set up HTTPS on your site you’ll need to purchase, activate and install a SSL Cert through your domain provider and then redirect to the HTTPS version. You can also do this through a CDN service, which we’ll discuss below.
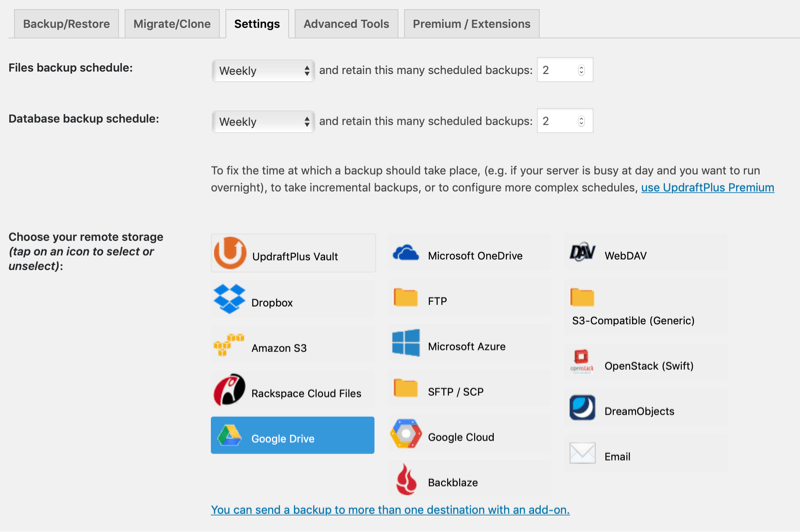
23. Setup automatic backups
WordPress doesn’t include a built-in backup system, you’ll need to implement a backup strategy on your own. Regularly backup your full site and database daily, weekly or monthly depending on your content frequency, so that if anything happens you can easily restore a previous version. UpDraft Plus, BackupBuddy and VaultPress are popular plugins.
Related: Using UpDraft Plus to backup your site automatically
24. Setup legal pages and functionality
When it comes to running a blog or website, there are a couple of guidelines and rules you need to follow. For example, you will need to create a couple of legal pages and implement a cookie notice that collects consent. Cookiebot, Complianz and iubenda offer some popular plugins for this.
25. Setup anti-spam
While you can enable moderation settings in WordPress comments to help with spam, installing an anti-spam plugin tends to be more effective. My favourite combination is FV Antispam and Akismet.
FV Antispam moves computer-generated spam comments to the trash automatically so you don’t have to filter through to find genuine comments. While Akismet, which is the most popular spam plugin out there, deals with human spam comments. It checks your comments and contact form submissions against their global database to mark suspicious content.
26. Setup Caching
Slow loading times can limit traffic to your site and affect your search engine rankings. A caching plugin can help improve the speed of your site. Some popular choices are WP Super Cache, Autoptimize, WP Rocket, W3 Total Cache and Hummingbird by WPMU Dev. Your web host may also have this option.
27. Setup CDN
You can also connect your site to a content delivery network (CDN). It stores your site on a network of servers around the world, so when someone visits your site they get served it from the nearest server. This makes your site much quicker. Popular options include CloudFlare and StackPath (formally MaxCDN).
28. Limit post revisions
Every time you save, update or auto-save a blog post on your site, WordPress stores an infinite number of revisions on your database. This can increase in size as your site grows and you update previous posts. I recommend setting a limit to post revisions to only save the previous couple of versions.
Launch your WordPress site in just 5 days!
My mini-guide will be delivered to your inbox for five days and take you step by step through setting up and launching your self-hosted WordPress site.
Themes + Customisations
29. Install your theme
A WordPress theme is made up of several files. These control the style and layout of your site, and are responsible for how content is displayed to your visitors. There are thousands of themes out there for WordPress – you get free or paid from themes from third-party sites, theme developers and market places. You can also access a bunch of free themes from the WordPress Theme Directory itself.
To do this, go to Appearance > Themes > Add New. You can preview the themes availble from here and choose one to install. If you already have a theme from somewhere else, click Upload Theme and follow the instructions you received with the theme.
Looking for recommendations? Try Nose Graze, EmPress themes, A Prettier Web and Kotryna Bass Design. Some other places that do really pretty themes are Station Seven, Solo Pine Designs, Restored 316, Feast Design Co, 17th Avenue Designs and Made To Thrive. Market places such as Themeforest and Creative Market also have a great selection.
30. Delete unused themes
WordPress comes with its own default themes known as the Twenty-Something series. Old themes and plugins that are not regularly updated put your site’s security at risk so I recommend removing them from your live site. To do this, go to Appearance > Themes, click on the theme you want to remove and you’ll see a delete link within the lightbox.
31. Setup child theme
Once you’ve installed your theme, it’s a good idea to setup a child theme. This will allow you to modify your theme without causing permanent damage to your main theme, or losing changes once your theme updates.
32. Setup menu
A navigation menu is a list of links pointing to the important areas of your site. To setup your navigation menus, go to Appearance > Menus.
You need to provide a name for your menu and then click the Create Menu. Now you can choose the links you want to add to the menu. You can select specific pages, categories, tags and custom links from the column on the left.
You can drag and drop the options to rearrange the order, or drag one menu under another to create a submenu item. You’ll then need to select the location under menu settings. The amount of menu options and location will depend on your theme.

33. Setup widgets
By default, WordPress puts some widgets on the main sidebar. Widgets add extra content or functionality to certain areas of your site. Common widgets include search, archives, recent posts and categories. Widgets can dragged and dropped to particular areas of your site, known as widget-ready areas, which is controlled by your theme.
You can see the options you have from the Widgets screen, under Appearance > Widgets. Here you’ll see all the available widgets on the left and your theme’s widget areas on the right side.
To add a widget to a widget area on your site, drag and drop it from the list on the left to an area on the right. Each widget comes with its own settings, which you can see after adding the widget.
34. Setup social
You’ll want to setup some social media functionality to your site. This may be adding share icons to your blog posts or follow icons to your sidebar.
Your theme may include this functionality, or you may have a plugin (like Jetpack) already installed on your site that does this. There are hundreds of plugins available for social icons and social share buttons.
When sharing to social media the title, description and image encourage people to click-through. These can be specified by site owner by adding social meta tags that tells platforms like Facebook, Twitter and Pinterest what content to display. You may also wish to install Pinterest Rich Pins, Twitter Cards and the Pinterest Save button to add extra functionality. You can also enable these with the Yoast SEO plugin.
35. Refresh and optimise images
WordPress has some default sizes that are used throughout your theme. If you don’t specify the media sizes properly, then WordPress will load the entire image and then scale the image down with every page load. If you do specify the media sizes, WordPress will create multiple copies of each image, resized for devices of different sizes. Then when an image is requested, WordPress will serve the image with the exact dimensions needed.
To set these, go to Settings > Media and configure these sizes according to your theme.

Having a lot of high-resolution images on your site will have a major impact on the loading speed. It’s a good idea to reduce the image’s size, you can do this using a compressing tool (like TinyPNG or JPEGmini), which will reduce the file size without affecting the quality. There are also plugins that will do this for you on WordPress, my favourite is WP Smush It.
When you install your new theme, you may notice some of the images are blurry or the wrong size. If this happens you can use a plugin called Regenerate Thumbnails to refresh the images to the newly set sizes.
That’s it!
Your WordPress install is set up and ready to go. I hope this article helped you setup your fresh WordPress install. You’re now ready to add content and launch your site – simply disable and delete the coming soon plugin.
